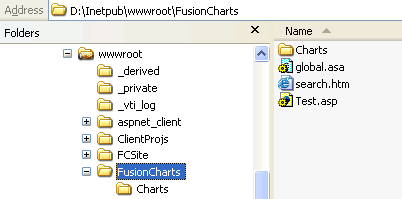
First, we need to create a space (a web application) which we'll use as our playground for learning FusionCharts. So, create a new web application folder FusionCharts (or some other name that you might want to give - myTestCharts, myChartApp etc.) under your web application root (wwwroot in case you are working with ASP/ASP.NET).
Next, we need to install FusionCharts for this newly created web application. So, we copy-n-paste the Charts folder from the download Package to the root of this application.
The folder structure should look as under:
Now, that we've installed the charts for our application, we'll need two more things to put this chart into action:
- Container Page for the chart: Firstly and essentially, we need an HTML page which would contain the chart. Since, we are developing a web application, there has to be an HTML page to contain the chart. Now, this HTML doesn't essentially have to be an HTML page - i.e., it can be an ASP, ASP.NET, CF, PHP, CGI, Perl page too - what we're talking about is a container to hold the chart. Infact, it can even be another Flash movie of yours (say a presentation, where you needed to show a chart) or a Powerpoint presentation.
- Data: A chart necessarily needs some data. FusionCharts needs its data in XML format, which we'll soon learn. For now, we should just know that we need to create an XML data document for FusionCharts.
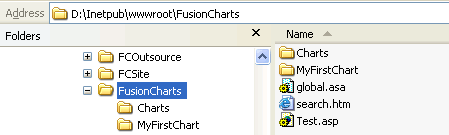
We'll create a folder MyFirstChart under
the recently created FusionCharts application.
So, go ahead and create this folder.
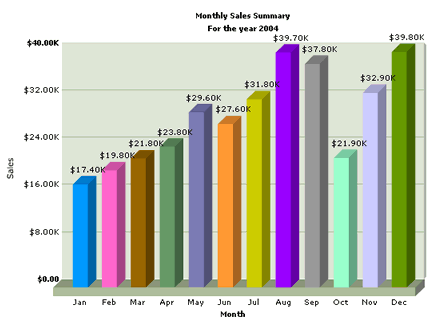
Before we build a chart, we first need to know what information the chart is going to represent visually. To start with, we'll build one of the most common charts used in business scenarios - monthly comparison of sales for the year. To explain the chart further, we'll create a 3D column chart, which will show us the monthly sales comparison for a particular year. Each column in the chart will represent a month.
The data table for the above chart can be represented as under:
| Month | Net Revenue |
| January | $17400 |
| February | $19800 |
| March | $21800 |
| April | $23800 |
| May | $29600 |
| June | $27600 |
| July | $31800 |
| August | $39700 |
| September | $37800 |
| October | $21900 |
| November | $32900 |
| December | $39800 |
<set name='Jan' value='17400' color='0099FF' />
<set name='Feb' value='19800' color='FF66CC' />
<set name='Mar' value='21800' color='996600' />
<set name='Apr' value='23800' color='669966' />
<set name='May' value='29600' color='7C7CB4' />
<set name='Jun' value='27600' color='FF9933' />
<set name='Jul' value='31800' color='CCCC00' />
<set name='Aug' value='39700' color='9900FF' />
<set name='Sep' value='37800' color='999999' />
<set name='Oct' value='21900' color='99FFCC' />
<set name='Nov' value='32900' color='CCCCFF' />
<set name='Dec' value='39800' color='669900' />
</graph>
Open your favorite text editor; punch the above XML code into it and save it as Data.xml under MyFirstChart folder.
And yeah - don't worry about whatever spaghetti stuff you have just written - we'll soon cover them. Basically, what we've done above can be listed in the following points:
- We've created the root <graph> element, with a few attributes to define captions, axis names and number prefix character, to consist everything.
- For each data row, we've created a <set> element.
- We've abbreviated the month names in our XML so that the chart doesn't get too cluttered up.
- We've stripped off $ sign from our figures, as FusionCharts needs pure numbers without $ or commas.
- We've specified a color for each data row.
Just as a measure to check if the XML document is valid (structurally), double click (from Windows Explorer) on it to open in your browser (if the default handler for XML files on your machine is the browser). If you open it in IE, you should get the proper formatted output.
And now, if you're running out of your patience to see this data in chart format, let's quickly build the HTML container for this chart.
<BODY bgcolor="#FFFFFF">
<OBJECT classid="clsid:D27CDB6E-AE6D-11cf-96B8-444553540000" codebase="http://download.macromedia.com/pub/shockwave/cabs/
flash/swflash.cab#version=6,0,0,0" WIDTH="565" HEIGHT="420" id="FC_2_3_Column3D">
<PARAM NAME=movie VALUE="../Charts/FC_2_3_Column3D.swf">
<PARAM NAME="FlashVars" VALUE="&dataURL=Data.xml">
<PARAM NAME=quality VALUE=high>
<PARAM NAME=bgcolor VALUE=#FFFFFF>
<EMBED src="../Charts/FC_2_3_Column3D.swf" FlashVars="&dataURL=Data.xml" quality=high bgcolor=#FFFFFF WIDTH="565" HEIGHT="420" NAME="FC_2_3_Column3D" TYPE="application/x-shockwave-flash" PLUGINSPAGE="http://www.macromedia.com/go/getflashplayer"></EMBED>
</OBJECT>
</BODY>
</HTML>
Save this file as MyFirstChart.html under MyFirstChart folder.
The code in bold above is the actual code that you need to place in your page to embed a FusionCharts chart.
In the above code, <OBJECT> and <EMBED> tags have been used to embed FusionCharts Column Chart (FC_2_3_Column3D.swf) within the HTML page. Also, notable is the string &dataUrl=Data.xml under the FlashVars parameter. This string (actually referred to as dataURL method of providing data to FusionCharts) indicates FusionCharts the source to pull the data from – Data.xml in this case.
These two tags are required to display a Flash movie in different Internet browsers properly. The <OBJECT> tag is used by Internet Explorer under Microsoft Windows and the <EMBED> tag is used by Netscape Navigator under Microsoft Windows or Mac OS. Each of these two tags acts in the same way, however using only one tag may cause incompatibility of one of the browsers. To ensure that most browsers will play your Flash movies, you should place the <EMBED> tag nested within the <OBJECT> tag as shown in the example. ActiveX-enabled browsers will ignore the <EMBED> tag inside the <OBJECT> tag. Netscape and old Microsoft browsers will not recognize the <OBJECT> tag and will use only the <EMBED> tag to load the Macromedia Flash Player.
And, it's now time to frutify the efforts that you have
put into creating your first chart. Get the Run
dialog box (Start > Run)
and enter the following:
http://localhost/FusionCharts/MyFirstChart/MyFirstChart.html
You'll see the following chart output: